拥有可复用的输入组件非常好。知道如何创建它们甚至更好!跟随我们的步骤,看看我们如何创建一个具有流畅接口的通用 TextInput 组件,仅用几行代码即可在各个地方重用。虽然它不是 Livewire 组件,但仍然可以利用 wire:model 和其他 Livewire 精确功能。这是如何实现的?继续阅读以了解更多!
角色的动机
在深入了解之前,让我解释一下为什么我不会使用 Livewire(说起来是一种 - 你会看到的)。看看我想实现什么
// example.blade.php
<div>
    {{ $this->getComponent() }}
</div>
// Example.php
class Example extends Component
{
    public $state;

    // this is default
    public function render(): View|Closure|string
    {
        return view('components.example');
    }

    // this is what I'm talking about
    public function getComponent()
    {
        return TextInput('Cool Input')
            ->required()
            ->statePath('state')
            ->disabled(fn($state) => strlen($state) > 8);
    }
}
正如你所见,我可以仅通过返回我刚刚创建的 TextInput 班级的实例来即时渲染一个 TextInput 组件。使用流畅 API,我可以配置它,它也可以反应其自身的状态。那么,为什么我们不使用 Livewire 组件呢?
为此,Livewire 组件有两个主要的缺点
- 每个组件都是一个孤岛。这意味着共享数据很快就会变得很繁琐。
- 您不能动态创建一个Livewire组件,然后再从PHP类中渲染它。试试看:在PHP类(Blade或Livewire组件)内部,创建一个新的Livewire类实例,并尝试渲染它。相信我,我试了很多次都失败了。这是不可能的。
现在,我已对使用Livewire组件表示了反对意见:让我们来做这件事,可以吗?
创建组件
让我们从一个简单的TextInput组件开始。就像提到的那样,这不会是一个Livewire组件,而是一个简单的Blade组件。稍后我们会看到我们如何仍然可以利用Livewire的核心功能,比如wire:model。
使用命令php artisan make:component TextInput创建组件。
添加简单的模板
<div>
    <label for="{{$name}}" class="block font-medium text-sm text-gray-700">{{$name}}</label>
    <input id="{{$name}}" class="border-gray-300 focus:border-indigo-500 focus:ring-indigo-500 rounded-md shadow-sm">
</div>
如你所见,非常简单:一个带有标签的输入框,放在div标签中。对于输入框的ID以及标签文本,我正在使用一个$name属性,这个属性将使用渲染组件时所用的view方法传递进来。这里有一个快速示例
public function render(): View|Closure|string
{
    return view('components.text-input', ['name' => 'Example Name']);
}
添加流畅接口
现在,让我们专注于组件的PHP类。我希望它能够实现一个流畅的接口,这样方法就可以像Laravel的查询构建器那样进行链式调用了。这里是如何做的一个提醒
// these methods (and others) can be chained to build up the query
$model::query()
  ->where('id', '>', 10)
  ->orderBy('created_at')
流畅接口通过在某一方法中返回当前类,使得链式中的下一个方法再次接收到这个类的实例。
让我们从一个make方法开始,它会利用类的构造函数来创建类的实例。在构造函数中,我们希望添加所有创建类实例所需的基本参数。目前,那只是一个组件的名称。
class TextInput extends Component implements Htmlable
{

    protected string $name;

    public function __construct(string $name)
    {
        $this->name = $name;
    }

    public static function make(string $name) : static
    {
        // app(static::class) will use the constructor of static::class (so, this current class: 'TextInput') to create an instance of this class with whatever parameters are supplied.
        return app(static::class, ['name' => $name]);
    }

    public function render(): View|Closure|string
    {
        return view('components.text-input',
        [
            'name' => $this->getName(),
        ]);
    }

    public function toHtml()
    {
        return $this->render();
    }

    private function getName() : string
    {
        return $this->name;
    }
}
在这个阶段,我们只是向组件传递一个名称,我们使用这个$name作为标签的文本和输入框的ID。在渲染组件时,我们使用私有方法getName检索名称。你可能想知道我们为什么不直接将$name属性设置为公开,但我认为当配置组件时它增加了太多的杂乱。我只希望这些方法当你配置组件时要公开,其他什么都不是。
为了让Blade引擎知道如何将组件类转换为HTML,我们实现Htmlable接口,并实现其中的toHtml方法。这将只是调用我们的render方法,这和在Blade模板中使用<x-component></x-component>是相同的。
为了在TestPage页面上渲染组件,我们可以使用getComponent方法来返回整个组件。在那里,我们将创建和配置组件。看看这个
class TestPage extends Component
{

    public function render()
    {
        return view('test-page');
    }

+   public function getComponent()
+   {
+       return TextInput::make('Test Input', $this);
+   }
}
这是TestPage的模板
<!-- test-page.blade.php-->
<!-- I'm using the Breeze app layout here. -->
<x-slot name="header">
    <h2 class="font-semibold text-xl text-gray-800 leading-tight">
        {{ __('Testing Page') }}
    </h2>
</x-slot>

<div class="py-12">
    <div class="max-w-7xl mx-auto sm:px-6 lg:px-8">
        <div class="bg-white shadow-sm sm:rounded-lg">
            <div class="p-4">

                {{ $this->getComponent() }}
            </div>
        </div>
    </div>
</div>
{{ $this->getComponent() }}将使用TextInput类中的toHtml方法将类实例转换为可用的HTML。如果我们加载这个页面,我们的组件会以我们希望的方式显示出来!


使用Livewire使数据响应式
到目前为止,我们的TestPage对输入框中的内容一无所知,它肯定无法对它做出反应。使用Livewire,我们只需将wire:model添加到一个HTML输入上,然后就可以了。这正是我们接下来要做的!让我们先将TestPage转换成一个Livewire组件,通过让它继承Livewire\Component而不是Illuminate\View\Component。
现在,我们需要将TextInput组件中的输入连接到我们的TestPage Livewire组件。怎么做到?如果我说TextInput组件将作为一个纯粹的HTML完全渲染,然后加入到TestPage Livewire组件的模板中,会怎样呢?
因此,如果我们把一个 wire:model 放到我们的 Blade 组件的这段 HTML 中……没错,我们可以在 Blade 组件中使用 wire:model!只需要它在 Livewire 组件内部渲染就可以了。
有一个注意事项:我们需要确保我们的 Blade 组件和 Livewire 组件能就使用哪个属性作为 wire:model 达成一致。为此,我会在 TextInput Blade 组件上添加一个 $statePath 变量,并在创建组件时将其传递进来。
class TestPage extends Component
{
+   // this will contain what the user entered in the TextInput component.
+   public string $state;

    public function render()
    {
        return view('livewire.test-page');
    }

    public function getComponent()
    {
        return TextInput::make('Test Input', $this)
+           ->statePath('state'); // this lets the TextInput know what to put in wire:model=""
    }
}
class TextInput extends Component implements Htmlable
{
    protected string $name;
+   protected string $statePath;

    // __construct() and make() method here, they are unchanged

+   public function statePath(string $statePath) : static
+   {
+       $this->statePath = $statePath;
+       return $this;
+   }

    public function render(): View|Closure|string
    {
        return view('components.text-input',
        [
            'name' => $this->getName(),
+           'statePath' => $this->getStatePath(),
        ]);
    }

    // toHtml() and getName() are also unchanged.

+   private function getStatePath() : string
+   {
+       return $this->statePath;
+   }
}
<!-- text-input.blade.php -->
<div>
    <label for="{{$name}}" class="block font-medium text-sm text-gray-700">{{$name}}</label>
-   <input id="{{$name}}" class="border-gray-300 focus:border-indigo-500 focus:ring-indigo-500 rounded-md shadow-sm">
+   <input id="{{$name}}" class="border-gray-300 focus:border-indigo-500 focus:ring-indigo-500 rounded-md shadow-sm" wire:model="{{$statePath}}">
</div>
我会在 Livewire 的 TestPage 模板中快速添加一行调试信息,以证明 wire:model 是工作的。只需在 Livewire 组件的任何地方添加这一行即可。
<span>Wire:model property = {{$state}}</span>
为了查看数据绑定(几乎)实时的情况,请将 TextInput 模板中的 wire:model 改为 wire:model/live。尝试在文本框中输入文本,页面应该会打印出值!
启用和禁用输入
现在让我们看看这项功能可以达到多远。通常,表单输入在某些条件下可以被禁用。让我们看看我们是否可以从 Livewire 页面中启用或禁用 TextInput blade 组件。让我们从一个从 Livewire 页面传递来的用于禁用/启用 Textinput 的布尔变量开始。
class TextInput extends Component implements Htmlable
{
    protected string $name;
    protected string $statePath;
+   protected bool $disabled;

    // unchanged methods here...

+   public function disabled(bool $disabled) : static
+   {
+       $this->disabled = $disabled;
+       return $this;
+   }

    // more unchanged methods...

+   private function isDisabled() : bool
+   {
+       return $this->disabled;
+   }
}
我们还需要更新模板,以便展示禁用状态。
<div>
    <label for="{{$name}}" class="block font-medium text-sm text-gray-700">{{$name}}</label>
-   <input id="{{$name}}" class="border-gray-300 focus:border-indigo-500 focus:ring-indigo-500 rounded-md shadow-sm" wire:model="{{$statePath}}">
+   <input id="{{$name}}" class="border-gray-300 focus:border-indigo-500 focus:ring-indigo-500 rounded-md shadow-sm disabled:bg-gray-100"
+          @disabled($disabled) wire:model.live="{{$statePath}}">
</div>
现在,如果在 Livewire 页面上添加一个 $disabled 属性以及一个切换按钮,并将它传递到 Textinput 组件中,我们会看到我们可以让组件打开或关闭。
class TestPage extends Component
{
    public string $state;
+   public bool $disabled = false;

    public function render()
    {
        return view('livewire.test-page');
    }

    public function getComponent()
    {
        return TextInput::make('Test Input', $this)
            ->statePath('state')
+           ->disabled($this->disabled);
    }

+   public function toggleDisabled()
+   {
+       $this->disabled = !$this->disabled;
+   }
}
以下是 Livewire 页面模板中切换按钮的样子。
    <button class="px-4 py-2 bg-blue-700 rounded-md font-semibold text-white hover:bg-blue-800" wire:click="toggleDisabled">
        Toggle
    </button>
通过切换 $disabled 属性,Livewire 组件将重新渲染。在重新渲染过程中,将再次调用 getComponent() 方法,因此 disabled() 方法将现在接收到 Livewire 页面 $disabled 属性的更新值。Blade 组件本身不是响应式的,但它在感觉上是响应式的,因为 Livewire 页面将在 Livewire 页面的公共属性更新时重新渲染组件。
我们可以以同样的方式将 闭包传递到 $disabled 属性,并根据其输入切换禁用状态。看看吧
class TextInput extends Component implements Htmlable
{
    protected string $name;
+   protected \Livewire\Component $livewire;
    protected string $statePath;
-   protected bool $disabled;
+   protected bool|Closure $disabled;

-   public function __construct(string $name)
+   public function __construct(string $name, \Livewire\Component $livewire)
    {
        $this->name = $name;
+       $this->livewire = $livewire;
    }

-   public static function make(string $name) : static
+   public static function make(string $name, \Livewire\Component $livewire) : static
    {
-       return app(static::class, ['name' => $name]);
+       return app(static::class, ['name' => $name, 'livewire' => $livewire]);
    }

    // some unchanged methods here...

-   public function disabled(bool $disabled) : static
+   public function disabled(bool|Closure $disabled) : static
    {
        $this->disabled = $disabled;
        return $this;
    }

    // more unchanged methods here...

    private function isDisabled() : bool
    {
-       return $this->disabled;
+       return $this->evaluate($this->disabled);
    }

+   private function evaluate($value, array $parameters = [])
+   {
+       $state = data_get($this->livewire, $this->getStatePath());
+       if ($value instanceof Closure) {
+           return app()->call($value, array_merge($parameters, ['state' => $state]));
+       }

+       return $value;
+   }
}
这里的重大更新是 evaluate() 方法。这使我们能够将闭包传递到 disabled() 方法,然后我们可以在运行时评估它。要做到这一点,我们需要获取与我们的输入连接的 Livewire 属性的值。我们可以通过将 Livewire 父类作为 $livewire 传递给我们的构造函数来实现,然后使用 data_get($this->livewire, 'state')。
这检索了 Livewire 组件上的 $state 变量。如果我们的 $disabled 属性是闭包,我们将使用 app()->call() 来调用它,并且使 $state 变量和我们作为函数参数定义的 $parameters 可用。这样,如果闭包使用了一个名为 $state 的变量,我们将在 Livewire 页面定义的 $state 变量的内容中传递。由于我们使用了 wire:model 将该变量连接到我们的输入,所以我们将收到输入值。太棒了!这使得我们可以根据输入值禁用我们的输入,例如,如果它超过 8 个字符。
// TestPage.php
public function getComponent()
{
    return TextInput::make('Test Input', $this)
        ->statePath('state')
        ->disabled(fn($state) => strlen($state) > 8);
}
显示错误
等等,好东西还没完!™️
除了 wire:model 之外,Livewire 还有更多技巧!让我展示验证在这里也工作得很好。我会快速在 $state 上添加一个验证规则,如下所示
+   #[Validate('required|max:8')]
    public string $state;
如果我们输入一个 9 个字符的字符串,我们不会有任何显示。我保证错误已经被抛出了!我们只是需要将它显示在 Textinput 组件上。
<!-- text-input.blade.php -->
<div>
    <label for="{{$name}}" class="block font-medium text-sm text-gray-700">{{$name}}</label>
    <input id="{{$name}}" class="border-gray-300 focus:border-indigo-500 focus:ring-indigo-500 rounded-md shadow-sm" wire:model="{{$statePath}}">
-   <input id="{{$name}}" class="border-gray-300 focus:border-indigo-500 focus:ring-indigo-500 rounded-md shadow-sm disabled:bg-gray-100"
-         @disabled($disabled) wire:model.live="{{$statePath}}">
+   <input id="{{$name}}" class="border-gray-300 focus:border-indigo-500 focus:ring-indigo-500 rounded-md shadow-sm disabled:bg-gray-100"
+         @disabled($disabled) @error($statePath) invalid @enderror wire:model.live="{{$statePath}}">
+   @error($statePath)
+     <span class="text-red-700 text-sm>{{ $message }}</span>
+   @enderror
</div>
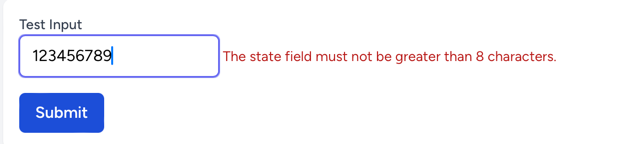
正如您所看到的,@error() Blade 指令与 Livewire 验证配合工作得很好。逻辑与响应式相同:我们的组件只是一个 Livewire 组件中使用的构建块,所以它“继承”了父组件的 Livewire 优点。
这就是我们需要的:一个完全可重用的 TextInput 组件!多亏了流畅的接口,它很容易使用,感觉就像 Laravel 一样本地化。在此基础上,它完美地集成了 Livewire,使得响应式变得轻而易举。感谢阅读,我们下次再见!
driesvints 喜欢这篇文章


 Laravel
  Laravel News
  Laracasts
  Laravel Podcast