快讯:您可以使用Laravel编写控制台应用程序!实际上,这种感觉有点像Laravel,又有点不像。让我们更深入地了解Laravel Zero以及您可能想了解的一些有趣的事情吧!
对Facades的支持
首先:有对Facades的支持,例如Process、Http或Log。这使得我们可以通过一条命令启动api调用。下面是一个示例,展示了如何从即将推出的软件包中获取在Fly.io上创建的组织列表。
首先,我们需要进行身份验证,就像flyctl一样。为此,我们可以运行fly auth token来让flyctl打印它使用的令牌。使用php application make:command ExampleCommand创建一个新的命令,并在其中的handle()方法中添加以下内容:
public function handle()
{
    try
    {
        $result = Process::run('fly auth token')->throw();
        $token = $result->output();
        $this->info("got token successfully");
    }
    catch (ProcessFailedException $e)
    {
        $this->error($e->result->errorOutput());
        return Command::FAILURE;
    }

    return Command::SUCCESS;
}
我将一切包裹在try-catch块中,因此每当Process::run方法失败时,它会抛出一个错误(Process::run之后的→throw()方法负责这一点),这个错误会被捕获,打印出出了什么问题,并确保返回Command:FAILURE。这样,我们就可以假设一切都很顺利,如果有什么不是,catch块就会把它抓住!这样,我们就不必为每个Process:run编写一个if-else块来检查它是否成功,如果失败,就打印出错误。
现在我们已经有了身份验证令牌,让我们用它做些事情,怎么样?我们可以像这样获取Fly.io上的所有组织:
try
{
    $result = Process::run('fly auth token')->throw();
    $token = $result->output();
    $this->info("got token successfully");

+   $response = Http::withToken($token)
+       ->acceptJson()
+       ->contentType("application/json")
+       ->post('https://api.fly.io/graphql', ["query" => "query {currentUser {email} organizations {nodes{id slug name type viewerRole}}}"]);
+
+   // organizations will be an array of arrays that look like this: array("id" => , "slug" => , "name" => , "type" => , "viewerRole" => )
+   $organizations = $response->collect("data.organizations.nodes")->toArray();
+   $this->info("get organizations successfully");
}
注意,您可以使用HTTP封装层,就像您已经在Laravel中那样使用过?这将一直方便,简直就像👨🍳💋!您只需在使用之前安装它,否则您会得到一个BindingResolutionException。只需运行php <your-app-name> app:install http即可设置成功!
创建任务
一位智者曾经说过:"控制台应用程序的好坏取决于其输出的外观"。好吧,这可能是完全错误的,但仍……让我们比较一下我们的示例应用程序的输出和它们可能的样子


下面的那个看起来更好,对吧?这是通过定义任务实现的。每个任务都有一个标题和一个匿名函数。"正在加载……"在函数执行时显示,当函数返回true时更新为✔,当返回false时更新为❌。不错,对吧?
尽管如此,如果您不小心,这些匿名函数可能引入作用域问题!默认情况下,PHP中的匿名函数与其定义的父范围不共享作用域。这意味着我们无法使用在匿名函数外部定义的变量。幸运的是,有一个很有用的use关键字(看看这个):它可以将外部的变量共享到匿名函数中。有两种方法可以减轻这种影响
-
use ($variable):$variable的值可以更新,但父范围不会继承其上面匿名函数中对其进行的更改。让我使这一点更加清楚
$variable = 1; // value is 1
$this->task("Scoping example", function () use($variable) {
    $this->info($variable); // will print '1' to console output
    $variable = 23; // value becomes 23
    $this->info($variable); // will print '23' to console output
}); // changes made to $variable will be forgotten here
$this->info($variable); // this will print '1' to console output
因此,use($variable)基本上是将父的$variable的值复制到函数内部的新$variable中。函数内部的更改不会复制!
-
use(&$variable):$variable的值将在父范围和匿名函数之间共享。如果您想保留在匿名函数中对$variable所做的更改,那么您应该使用这种类型。让我们比较一下与use($variable)
$variable = 1; // value is 1
$this->task("Scoping example", function () use(&$variable) { // notice the '&' added here
    $this->info($variable); // will print '1' to console output
    $variable = 23; // value becomes 23
    $this->info($variable); // will print '23' to console output
  }); // changes made to $variable will NOT be forgotten here
  $this->info($variable); // this will print '23' to console output, instead of '1'!
这是通过值传递如use ($variable)和通过引用传递如use(&$variable)之间的差异。
以下是考虑可能的范围问题时的任务外观
+ $token = "";
+ $this->task("Getting token", function() use (&$token) {
    $result = Process::run('fly auth token')->throw();
    $token = $result->output();
+ });

+ $organizations = [];
+ $this->task("Getting organizations", function () use($token, &$organizations) {
    $response = Http::withToken($token)
        ->acceptJson()
        ->contentType("application/json")
        ->post('https://api.fly.io/graphql', ["query" => "query {currentUser {email} organizations {nodes{id slug name type viewerRole}}}"]);

    // organizations will be an array of arrays that look like this: array("id" => , "slug" => , "name" => , "type" => , "viewerRole" => )
    $organizations = $response->collect("data.organizations.nodes")->toArray();
+ });
创建交互式菜单
有很多酷炫的功能要展示,但我会在这里用交互式菜单结束。假设我正在创建一个只需一键即可在Fly.io上部署应用程序的包(我是),并且我需要询问用户他们想在哪个组织中部署(我需要)。然后我会像上面展示的那样获取所有组织,并将它们显示在菜单中供您选择(我会)。下面就是我如何做到这一点的确切方法
+   $selectedOrg = $this->menu("Select Organization", array_column($organizations, 'name'))
+       ->open();
+
+   if ($selectedOrg =="")
+   {
+       // user selected "Exit"
+       $this->info("Exiting.");
+   }
+   else
+   {
+       // user selected an organization
+       $this->info("Selected Org Name: ");
+       $this->info($organizations[$selectedOrg]['name']);
+   }
}
    catch (ProcessFailedException $e)
这将创建一个命令行中的菜单(!)且其外观如下(!!)

但疯狂的事情还没有停止,哦不!这里有很多可定制的选项。我可以使同一个菜单看起来像这样
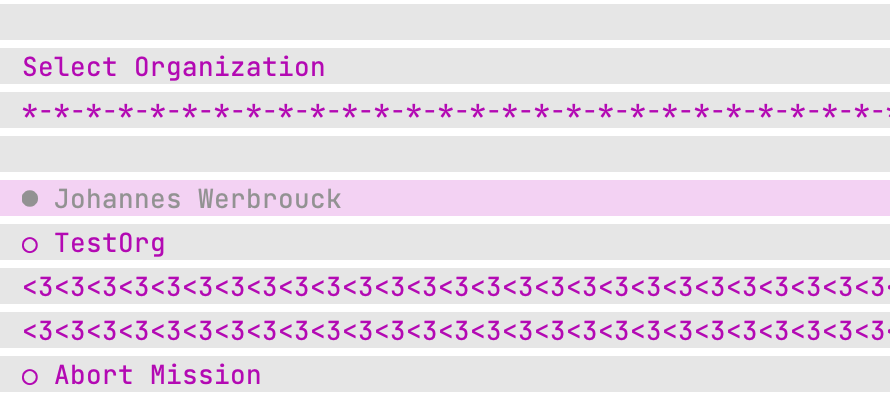
以下是它的样子
    $selectedOrg = $this->menu("Select Organization", array_column($organizations, 'name'))
+       ->setForegroundColour('magenta')
+       ->setBackgroundColour('white')
+       ->setWidth(200)
+       ->setPadding(10)
+       ->setMargin(5)
+       ->setExitButtonText("Abort")
+       // remove exit button with
+       // ->disableDefaultItems()
+       ->setTitleSeparator('*-')
+       ->addLineBreak('<3', 2)
        ->open();

    if ($selectedOrg =="")
    {
        // user selected "Exit"
        $this->info("Exiting.");
    }
    else
    {
        // user selected an organization
        $this->info("Selected Org Name: ");
        $this->info($organizations[$selectedOrg]['name']);
    }
}
    catch (ProcessFailedException $e)
包装起来
这些只是Laravel Zero可能性的其中一些。关于构建控制台应用程序,我将为您提供一些快捷提示:使用php <application-name> run:build <build-name>可以构建一个独立的应用程序。请注意,它需要在客户端上安装PHP。
另一种使用您已构建的命令的方式是通过composer来要求您的包。我不想让Packagist上了我的开发包(我不想),所以我展示了如何使用github添加它
// add this in the lowest level in composer.json, on the same level as 'name', 'license' and 'require'.
"repositories": [
    {
        "type": "vcs",
        "url": "https://github.com/<organization name here>/<repo name here>"
    }
],
然后,您可以使用composer require <organization name>/<repo name>在github项目中安装最新版本
我现在就停止写。我希望这已经很有用了,如果您有任何小到中等规模的任务需要自动化,请考虑Laravel Zero!
driesvints, abdessamadbettal 喜欢了这篇文章


 Laravel
  Laravel News
  Laracasts
  Laravel Podcast